Good pre-treatment preparation is, at its core, simple, clear, and practical — and it must always align with the treating practitioner’s clinical judgment. Clients want minimal discomfort, fast recovery, and consistent results, and they don’t want poor preparation to slow down their progress. Clinics, meanwhile, need a replicable workflow that screens for risks and delivers consistent quality across every operator. This process can’t be a one-size-fits-all template. It needs to account for different body areas, hair types, skin baseline, and client history — and it has to match the capabilities of the device being used. Put simply: solid pre-treatment work cuts your aftercare workload in half.
Why Pre-Treatment Preparation Directly Impacts Recovery Speed
808nm diode laser targets melanin in active hair follicles with light energy, and destroys their growth capacity through thermal effect. If pre-treatment sun care is neglected, hair is removed incorrectly, or the skin is already inflamed, the epidermis will absorb extra energy during treatment. At best, this leads to longer-lasting redness and stinging; at worst, it can cause blistering or hyperpigmentation.
Well-prepared skin, by contrast, allows energy to focus more precisely on the follicles. That means milder post-treatment reactions, faster resolution, and more effective treatment overall.
Key Questions to Cover in the Pre-Treatment Consultation
A proper consultation isn’t just a perfunctory check for allergies — it needs to dig into the right details.
First, sun exposure history: have there been any recent sunburns, beach trips, or use of tanning products in the past two weeks? Has the client had any other energy-based aesthetic treatments recently?
Then, skin and medical history: is the client prone to keloids? Do they have recurring cold sore outbreaks? Do they have diabetes, clotting disorders, or take any photosensitive medications? Also ask about previous hair removal experience: have they had laser hair removal before, what device was used, and did they have any adverse reactions? For female clients, confirm pregnancy, breastfeeding status, and sensitivity during the menstrual cycle.
This information isn’t used to turn clients away — it helps the practitioner decide if treatment is appropriate, how to adjust parameters, and what reactions to expect after the session.
When to Postpone Treatment: Skin Conditions to Watch For
Not every skin is ready for laser on any given day. If the treatment area has cuts, active inflammation, eczema, or dermatitis, wait until the skin is fully healed. If the skin is red and warm from recent sun exposure, wait at least two weeks for the skin tone to return to normal. If the client has had other invasive or semi-invasive treatments like chemical peels or fractional laser recently, allow a sufficient interval.
One often-overlooked case: clients using at-home chemical exfoliants or high-concentration retinol products, which leave the skin in a sensitive state. These should be paused for a period of time and assessed before treatment.
Don’t push through a treatment just to book a session — the risks far outweigh any short-term gain.
How Strictly Should Sun Protection Be Followed Before Treatment?
Generally, strict sun protection is recommended for at least two weeks prior to treatment. That doesn’t mean staying indoors entirely — it means avoiding direct, prolonged sun exposure on the treatment area. UV radiation increases melanin activity in the epidermis, which leads to more energy absorption during treatment, stronger post-treatment reactions, and a higher risk of hyperpigmentation.
For constantly exposed areas like the face and neck, daily broad-spectrum sunscreen is usually sufficient. For areas like the limbs and torso that don’t see regular sun, take extra care to avoid sudden long exposures — like a beach vacation or outdoor team building — and schedule treatments accordingly.
The Right Way to Prepare Hair Before Treatment
Many clients assume they should pluck or wax the area completely clean. The opposite is true.
The correct approach: 1–2 days before treatment, shave the treatment area with a razor, leaving about 1mm of stubble. Do not use depilatory creams, pluck, or wax — these methods remove the hair root from the follicle, leaving the laser with no target and reducing treatment efficacy.
Be careful not to nick the skin while shaving. If there is any breakage, inform the practitioner so they can decide whether to postpone. Stubble length isn’t just “shorter is better” — the right amount helps the operator assess hair direction and density, and allows energy to conduct more precisely into the follicle.
Which Medications and Skincare Products Should Be Paused?
For oral medications, common photosensitive drugs such as certain antibiotics and retinoids should be discussed with the practitioner in advance to confirm if and how long they need to be stopped. For topical products, high-concentration acids, retinol, and retinal products should be paused 3–5 days before treatment, especially for facial sessions.
Not everything needs to be stopped. Basic moisturizer and gentle sunscreen are fine to use. Clients don’t need to overdo it with pre-treatment routines — exfoliation, intensive masks, and active treatments are unnecessary. The more stable the skin, the safer the treatment.
How Pre-Treatment Prep Differs by Body Area
One set of rules doesn’t work for the entire body.
- Facial hair removal: Remove all makeup before treatment. Skin should be clean. For lip hair, check for active cheilitis, and note any recent lip tinting or permanent makeup.
- Underarm hair removal: Do not apply antiperspirant or body lotion before treatment. Keep skin clean and dry.
- Limbs and torso: Check for sunburn and dry, flaky skin. A gentle, lightweight body moisturizer is fine before treatment, but avoid heavy, oily products.
- Bikini/intimate areas: Check for inflammation or breaks. Simple cleansing is all that’s needed — avoid harsh, scented washes.
How to Give Pre-Treatment Instructions That Clients Actually Follow
Many clinics go through a long list of rules, only for clients to forget most of them and call back with questions later.
Effective communication does three things:
- Explain what normal feels like — warmth, mild tingling during treatment, and redness that lasts from minutes to hours afterward. Setting expectations prevents clients from panicking at the first sign of redness.
- Be clear about what must not be done — no plucking, no sunbathing — and explain why. Clients are far more likely to comply when they understand the consequences.
- Provide written aftercare instructions and a clear contact for questions.
Don’t make empty promises like “completely painless” or “results in one session.” Being upfront about individual differences reduces disputes and builds trust.
How Clinics Can Standardize Pre-Treatment Preparation
Relying on memory leads to mistakes. A structured process is what delivers consistency.
First, use a standardized consultation form that lists all required questions, to be filled out by the client and reviewed by the operator. Then, follow a fixed pre-treatment assessment: check skin condition, hair type, medical history, and sun exposure. Next, standardize shaving, photography, and parameter verification steps. Finally, document everything in the client’s file for comparison and adjustment at future sessions.
A standardized process isn’t about limiting practitioners — it’s about helping new staff get up to speed quickly, helping experienced staff avoid oversights, and keeping treatment quality consistent across the clinic.
808nm Device Features That Support Good Pre-Treatment Practice
A great device doesn’t work in isolation — it fits into your clinical workflow.
For example, sapphire contact cooling works best when the skin is stable pre-treatment, delivering consistent epidermal protection throughout the session and reducing discomfort. Different-sized treatment heads match the pre-treatment shaving requirements of different areas: small spots for precision work on the lip and hairline, large spots for faster treatment on the back and legs. Parameter recording functionality stores settings and skin reactions from every session, so the next treatment can build on previous data instead of starting from scratch.
When choosing a device, don’t just look at wavelength — look at whether these details support your day-to-day workflow.
Why Pre-Treatment Photos Matter — and How to Take Them Properly
Pre-treatment photos aren’t just for marketing — they’re a baseline for treatment and recovery.
For photos to be useful, keep body position, lighting, camera distance, and hair length consistent across every session. Shoot in natural light where possible, and avoid filters or distorted lighting. Take photos before each session to track hair reduction and monitor skin condition. If a post-treatment reaction occurs, pre-treatment photos provide a clear baseline for comparison.
Always obtain client consent before taking photos, and store and use images in compliance with privacy rules. Never share them without permission.
How ZHEONE Supports Clinics in Pre-Treatment Standardization
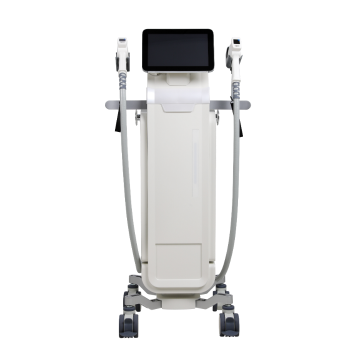
At ZHEONE, we don’t just sell devices — we integrate equipment capabilities with real-world clinical workflows. Our 808nm diode laser systems, with magnetic treatment heads in multiple sizes, sapphire mirror cooling, and traceable parameter recording, are built to fit right into a clinic’s standardized pre-treatment process.
We provide partner clinics with ready-to-use consultation templates, shaving protocols, and parameter guidelines by body area. It’s not just a manual and goodbye. From device installation to operator training to workflow setup, we work with your clinic’s specific needs to make every step of pre-treatment preparation actionable.
What Details Are Validated in Our Pre-Treatment Guidelines?
Our materials distinguish between pre-treatment considerations for 755nm, 808nm, and 1064nm wavelengths, and between single-wavelength and triple-wavelength devices. We outline pre-treatment assessment points and parameter references for different skin tones and hair types, instead of giving one vague standard.
From recommended stubble length to sun protection SPF guidance to risk screening red flags, we lay it all out clearly to help clinics avoid common pitfalls.
How Our Training and Support Builds Solid, Long-Term Workflows
ZHEONE training isn’t a one-time theory lecture. Our clinical trainers provide hands-on on-site guidance, walking your team through consultation, assessment, shaving, and parameter setup step by step. For new staff, we have structured operation manuals and competency checklists. For established clinics, we help audit and refine existing workflows to close gaps.
Beyond training, we have dedicated contacts for day-to-day maintenance, troubleshooting, and ongoing technical support. Clinics can focus on delivering great service — we’ve got the equipment and process side covered.
FAQ
Q: I nicked my skin a little while shaving before treatment — can I still have the session? A: If it’s a very minor surface nick with no bleeding or redness, we can work around the area. If the cut is noticeable, painful, or inflamed, we recommend rescheduling until the skin is fully healed, to avoid extra irritation or infection risk.
Q: I have naturally dark skin — is there anything extra I should do to prepare? A: Clients with darker skin have more epidermal melanin, which absorbs more laser energy. Strict sun protection before treatment is even more important to avoid further darkening. Be sure to discuss your skin type and any recent sun exposure fully with your practitioner — they will adjust energy parameters accordingly.
Q: Do I need to apply numbing cream before treatment? A: For most areas, 808nm laser hair removal with the device’s built-in cooling system is well within a comfortable range, and numbing cream isn’t routinely needed. If you have a very low pain tolerance or are treating a particularly sensitive area, let your practitioner know in advance. They can assess and advise — we don’t recommend applying numbing cream on your own without guidance.